1. ODrive 软件开发环境搭建
1.1. 准备要用到的开发工具
使用到的ODrive开发工具为:
Python: 用于运行工程构建脚本,请用户自行下载;
Git for Windows: 用于版本管理和使用它的bash终端,请自行下载;
Visual Studio Code: 轻量级但功能强大的源代码编辑器,请自行下载;
ST-Link/V2 Drivers: STLink/v2编程器的驱动;
Tup: 用于调用编译命令的构建系统;
ARM GNU Compiler: 用于交叉编译代码;
OpenOCD: 用与使用STLink/v2编程器对ODrive进行烧录;
GNU MCU Eclipse’s Windows Build Tools: 用于工程构建。
4-8工具打包下载地址如下: 链接:https://pan.baidu.com/s/1XmcqF8QcqrKNknEMFJIlIg 提取码:swtg
1.1.1. 安装 Python
双击运行python-3.8.1.exe然后按照提示保持默认安装即可。
注意: 勾选上图中的 Add Python 3.8 to PATH 如下图:
 在这里插入图片描述
1.1.2. 安装 ST-Link/V2 Drivers
解压 ST-Link_Drivers.zip 生成 ST-Link_Drivers 文件夹,进入文件夹双击运行 dpinst_amd64.exe 按照提示保持默认安装即可。
1.1.3. 安装 Git for Windows
双击运行 Git-2.25.0-64-bit.exe 按照提示保持默认安装即可。
1.1.4. 安装 Visual Studio Code
双击运行 VSCodeUserSetup-x64-1.42.0.exe 按照提示保持默认安装即可。
也可去官方网站下载最新的版本。
1.1.5. 安装 Visual Studio Code 扩展插件
所需扩展插件:
C/C++
Cortex-Debug
推荐安装的扩展插件:
Include Autocomplete
Path Autocomplete
Auto Comment Blocks
1.1.6. 配置 Visual Studio Code 默认终端
配置 Visual Studio Code 默认终端为 git bash。设置步骤如下:【设置】-》搜索【terminal.integrated.shell.windows】-》打开【在settings.json】,修改如下:
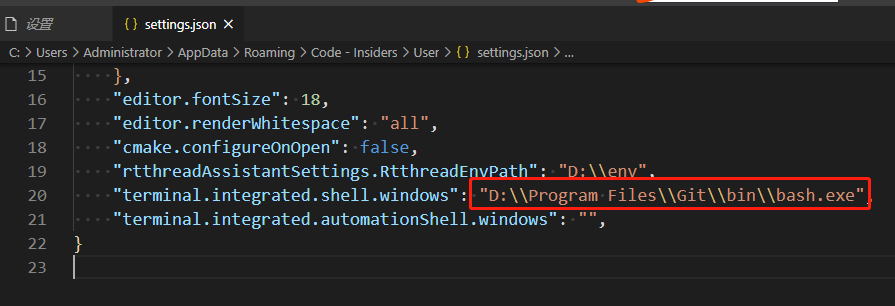
注意: 【D:\\Program Files\\Git\\bin\\bash.exe】为自己安装git的目录,用户需要切换到自己的安装目录即可,且配置完成后请关闭 Visual Studio Code 再进行下边的步骤
1.1.7. 配置 Tup
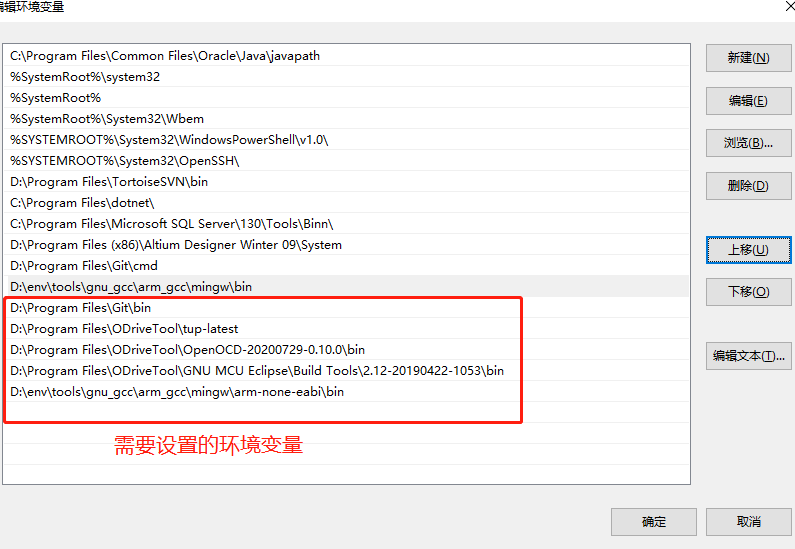
解压 tup-latest.zip 到任意位置,然后将 tup-latest 地址添加到系统环境变量 Path 中即可。
1.1.8. 配置 ARM GNU Compiler
解压 gcc-arm-none-eabi-7-2018-q2-update-win32.zip 到任意位置,然后将 gcc-arm-none-eabi-7-2018-q2-update-win32\bin 地址添加到系统环境变量 Path 中即可。
1.1.9. 配置 OpenOCD
解压 OpenOCD.zip 到任意位置,然后将 OpenOCD\0.10.0-13\bin 地址添加到系统环境变量 Path 中即可
1.1.10. 配置 GNU MCU Eclipse’s Windows Build Tools
解压 gnu-mcu-eclipse-windows-build-tools-2.12-20190422-1053-win64.zip 到任意位置,然后将 GNU MCU Eclipse\Build Tools\2.12-20190422-1053\bin 地址添加到系统环境变量 Path 中即可。
以上所有步骤执行完后的环境变量如下:
1.2. 编译固件源码
1.2.1. 下载源码
git clone https://github.com/madcowswe/ODrive.git
vscode 打开源码:双击 ODrive_Workspace.code-workspace 选择使用 Visual Studio Code 打开
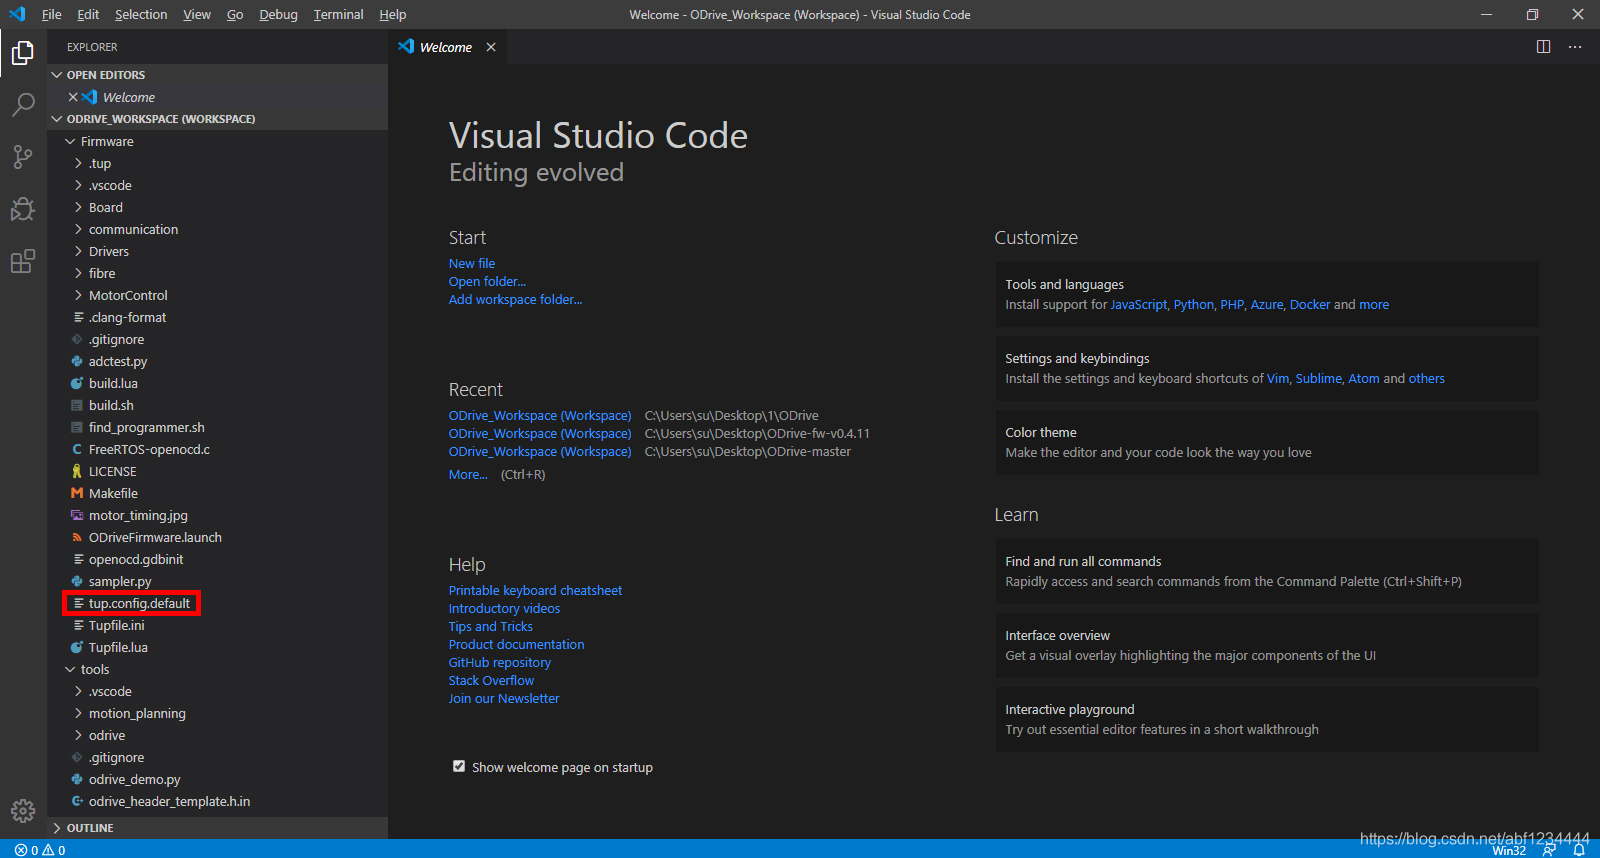 在这里插入图片描述
单击红框中的
在这里插入图片描述
单击红框中的 tup.config.default 文件,配置硬件版本,修改为如下代码:
# Copy this file to tup.config and adapt it to your needs
# make sure this fits your board
CONFIG_BOARD_VERSION=v3.5-24V
CONFIG_USB_PROTOCOL=native
CONFIG_UART_PROTOCOL=ascii
CONFIG_DEBUG=false
CONFIG_DOCTEST=false

# Uncomment this to error on compilation warnings
#CONFIG_STRICT=true
然后将 tup.config.default 文件重命名为 tup.config 然后保存。
1.2.2. 安装jsonschema插件
在vscode终端,安装
pip install jsonschema
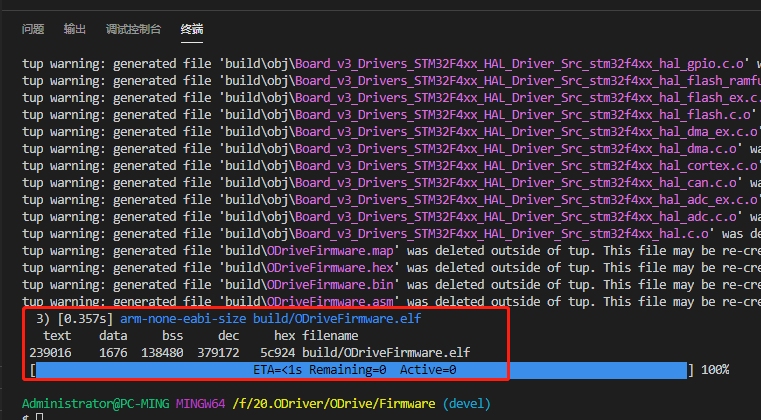
1.2.3. 编译
make -j4
1.2.4. 清除编译
make clean
注意:ODrive在编译前会自动检测git版本,如果不想检测,需要修改【tools/odrive/version.py】文件里面的get_version_from_git函数。
def get_version_from_git():
    script_dir = os.path.dirname(os.path.realpath(__file__))
    try:
        # Determine the current git commit version
        git_tag = subprocess.check_output(["git", "describe", "--always", "--tags", "--dirty=*"],
            cwd=script_dir)
        git_tag = git_tag.decode(sys.stdout.encoding).rstrip('\n')

        (major, minor, revision, is_prerelease) = version_str_to_tuple(git_tag)

        # if is_prerelease:
        #     revision += 1
        return git_tag, major, minor, revision, is_prerelease

    except Exception as ex:
        print(ex)
        return "[unknown version]", 0, 0, 0, 1
1234567891011121314151617
修改后:
def get_version_from_git():
    return "fw-v0.4.11-19-g1c947631*", 0, 4, 11, True
12
1.3. 烧录固件
VSCode配置会在此终端中运行命令make flash,来烧录固件。
1.4. 调试
Cortex-Debug 扩展插件,专门用于调试ARM Cortex项目。 您可以在此处阅读有关Cortex-Debug的更多信息:https://github.com/Marus/cortex-debug
确保将固件源码文件夹作为当前文件夹
用最新固件加载到ODrive (如果使用调试模式可以不需要此操作)
点击Debug -> Start Debugging (或键盘 F5)
处理器将重置并进入暂停
设置断点。注意: 您只能在处理器暂停时设置断点,如果在运行模式下设置断点,则不会应用它们
运行 (F5)
Stepping over/in/out, 重新运行, 按下
pause(F6) 按钮然后重新设置断点等当调试完毕后,您可以按下
stop(Shift+F5) 停止调试。同时它会自动关闭openOCD